Ok y'all, it was a busy year and I have finally taken the time to post some photos of my classroom and links to the fun stuff!
Here it is...the stage! Good news, my next post will be centered around how I made this beauty!
This stage is so special to us. I teacher from this stage. The students teach from this stage. We present our work from this stage. We retell our reading from this stage. This was the best decision I made this last school year. IT was worth the elbow grease!
Affiliate Links:
Chair
Here's one side of my classroom library. I include leveled readers in my library as well as interest-directed books.
Affiliate Links:
Rug
Chairs
Book Bins and Clip Boards - Really Good Stuff
This is the most whimsical part of our classroom. We call this our "dream tree" because we added our photos and our goals and dreams to it throughout the year.
Affiliate Links:
Tree
Pillow
Decor
Here's a look at my small group space! We love our color coordinated circles and stools. I ordered the circles from Etsy and got the stools from Five Below and Family Dollar last year. The circles adhere to the table and are perfect for writing on with a dry erase marker.
You can also find similar stools through Amazon:
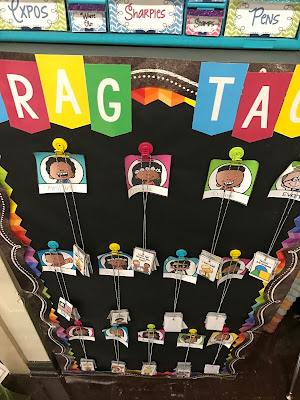
This is the first year that I implemented brag tags in my classroom. Students earn brag tags for achieving goals, good behavior and a number of other things. They collect them on a necklace and get to wear their necklaces on Fridays!
Affiliate Links:
Here is our cubby space and also my own organization space. I do not have a teacher desk, so this area keeps my life together. The baskets are from Really Good Stuff and the sign is from Target.
These two spaces hold our supplies and manipulatives so that they are available for students to access independently. My goal is always to create a classroom environments that promotes student independence, these area make that possible. You can also see our early finisher baskets kept above. I do not use things in my baskets that require tons of time. I usually put file folder games, and familiar workstations in there that students can do independently.
This pencil bar saved serious sanity this year! You can grab those drawer labels from GlitterandGlue4k2's TpT store! I grabbed those gumboil machines from The Dollar Tree too!
This is the other side of our classroom. This holds our calendar, flexible seating chart, and objectives.
Affiliate link:
Our objectives are typed and adhered using Velcro, to these boards that I spray painted so they are easy to change out!
Here is the flexible seating chart that I used last year to allow my students choice in their seating. This system worked okay, but this is something I think I will change next year.
Affiliate Links:
Here's a peek at the border combo I used this year. I loved, loved, loved it! I had a board for each content area and the vocabulary that we had learned.
Affiliate Links:
I was so in love with these silhouette kids from Schoolgirl Style that I had to have them in my room. I bought the file from her TpT store and traced them using my projector and black paper.
That's all for today! Stay tuned for my next post all about that stage!


