Image Map

My Classroom

Each time I post the following pictures of my classroom on Instagram, I get so many questions about my mat, my border, and the alphabet! I figured I would create this space to hold all of the information in one spot for those wondering.

This post does include affiliate links.


My beautiful rainbow mat came about because my classroom did not have a rug when I came to my current school. Y'all rugs are EXPENSIVE. I couldn't even bring myself to make a Donors Choose project for one because they just cost too much and I could use that money so many many other things! I found this mat on Amazon and was so happy with the bright colors when it showed up in the mail. You could certainly mix the colors, but I chose to  ROYGBV it. 

I ordered  sets, so it was $60. I have fit a class of 23 kindergarteners very comfortably on it. Here's the link!


I made the border by cutting circles from rainbow card stock using a large circle hole punch. Surprisingly, I use the circle hole punch more than I thought. I've used it for making caterpillars, and quick labels around the room.


You can grab the rainbow alphabet in my TpT store by clicking below.


If you look closely you can also see our classroom job below the board. We LOVE our job chart. It uses community helpers to connect classroom jobs to jobs in the real world. You can grab that in my TpT store below as well.


The letter focus chart was purchased from Lakeshore Learning a few years ago and I'm not sure that they still carry it.

Here are links to a few things on my board:


Thanks so much for reading and I hope you find something to take away this school year!


Stepping Up Student Engagement - Number Sense Part 1

Hi everyone! Thanks for stopping by to catch up on what's happening in my classroom right now with number sense! I love math. I think because I love math, my students love math. Funny how that works, right? Today I'm sharing a couple things we've been doing to boost student engagement and make learning number FUN!

1. Counting Pizzas


I've done fraction pizzas. I've eaten a lot of pizza. Now we made counting pizzas! Students each got their own pizza that I laminated and placed inside of a personal pizza box.

Grab the personal pizza boxes by clicking the affiliate link below!


Students started by following their menu and counting the correct number of toppings.


They then got a blank menu. Each student had to put their own toppings on, then write how many they had on their pizza.


The pizza shop music and chef hats were the icing on the cake (or maybe the cheese on the pizza)!
To make the chef hats I just used white sentence strips and tissue paper!


The music was just an instrumental version of That's Amore from YouTube:

https://www.youtube.com/watch?v=Fs2Wqh-nCb0

Questions? Comment below or message me on Instagram!
You can also e-mail me at theteachingfox@yahoo.com

I'll be back soon for part two!

2017 Bold & Bright Classroom Decor Set from Creative Teaching Press

Hey y'all! 

I'm so excited to share this beautiful set of classroom decor with you AND give you the opportunity to WIN this ENTIRE COLLECTION from Creative Teaching Press! Whoop, whoop!

First let me show you some photos of the adorable pieces that the creative geniuses at CTP included in this set...


Here is a set of materials from the collection. The borders are lined along the bottom!


I love this beautiful calendar that's the perfect mix of simple black/white and bright colors.


This is one option that the set includes for a classroom birthday board. I love that it's super unique! 


They even included station cards!


How adorable are these classroom jobs?!

If you're classroom vision for the year includes a balance of clean black & white balanced with bright pops of color, this is the perfect set for you!

I'm teaming up with Creative Teaching Press to give away the ENTIRE Bold & Bright collection to one lucky winner! Enter the contest below!


Book Release Party

Hey y'all! I'm so excited to share the details of our book release party with you today! 

For a portion of our kindergarten curriculum at my last district, we worked on writing personal narratives. This was the perfect time to create a keepsake for my kiddoes! There are a few different ways that you can publish hardcover books with students. I purchased Illustory kits from Amazon.

Affiliate link:


What I liked about these kits was that each student got their own box and set of markers so they could keep track of their own work. We did one page per day in our books, then I mailed them in the pre-paid envelopes to be created. We had our books back in about two weeks! Then it was time to plans our big book release party!


Popcorn boxes: Five Below
CELEBRITY TAPE: Party City


The gold decor was purchased at Dollar Tree!


I found that fun HOORAY balloon at Target!


I always love to put some tape over the door because it makes it even more exciting for the students to walk into the room. 


Those gold poles? Toilet plungers from Dollar Tree and gold spray paint. Yep!
I also grabbed that red carpet from Party City so that I could reuse it. You could also use red butcher paper though.


Here's what our classroom looked like when the students walked in. Celebrity status! I wrapper their books in red paper and wrote them each a personalized note in the front that they could keep.


Then they got to walk the red carpet to the stage to read their book aloud!


It was such a memorable day! Each child had the chance to share their writing and experience being an author and illustrator. This is something I will continue to do for years I think. My students truly felt like celebrities. 

If you have questions leave a comment, send me an e-mail, or message me on Instagram!

Bye, y'all!


SaveSave

Problem Solving Through Magic


In Virginia, we teach addition and subtraction up to 10 in kindergarten. Typically addition comes first, then subtraction, sometimes with a break between the two. By the end of addition, THEY GET IT! By the end of subtraction, THEY GET IT! It's amazing and kinders just love to add and subtract. 

However, later in the year I love to revisit them, assess what students have retained, and dig into the two a little deeper while we get the kiddoes ready to be firsties. That's when I usually do 1-2 weeks of general problem solving. We look at tons of story problems and figure out whether the story problems are telling us that we need to add or subtract. That means there's a high focus on vocabulary, comparison, and strategy practice to actually solve the problems. This is A LOT to ask kindergarteners to do, so it's incredibly important that you break it down into manageable chunks AND make it engaging! Cue problem solving through magic!

Before I started this week, I spent time reviewing addition and subtraction, as well as strategies we can use to help us with the two (manipulatives, number lines, ten frames, etc.).

Our focus was on one magic trick per day, with that trick then moving to an independent workstation the following day.

Trick #1

Unlocking the Magic 


For this trick I used story problems that you can find in my Math Magicians Set on TpT. Students had to read the problem, decide what equation from the keys matched that problem (there was a mix of + and -), and match that key to the correct answer on that lock. They knew they were correct if their key unlocked the lock.


I purchased my addition and subtraction locks from Lakeshore but you could also make your own with these locks and keys from the Amazon affiliate link below:


Trick #2

Pull a Rabbit Out of a Hat


I found these rabbit eggs at Dollar Tree around Easter! They were perfect for placing the addition and subtraction vocabulary words in.


Students had to pick a rabbit and create a story problem using that vocabulary word, then write the corresponding equation.


All of the printable materials for this are included in my Math Magicians set on TpT!

Trick #3

Pick a Card, Any Card!


I found these BEAUTIFUL rainbow cards at Five Below. Students had to pick a card, then come up with an addition or subtraction equation that had that answer. This was a little challenging, but they loved it! 

Trick #4


For this trick, I placed balls under one cup and moved them around. Students had to find the balls under one of the cups and draw it. I then either took some away or added some of the other color and students had to complete the equation.

Here are some of the materials that I purchased from Amazon to make this happen!

Affiliate Links:


Enjoy!


2016-2017 Classroom Tour


Ok y'all, it was a busy year and I have finally taken the time to post some photos of my classroom  and links to the fun stuff!

Here it is...the stage! Good news, my next post will be centered around how I made this beauty!


This stage is so special to us. I teacher from this stage. The students teach from this stage. We present our work from this stage. We retell our reading from this stage. This was the best decision I made this last school year. IT was worth the elbow grease!

Affiliate Links:

Chair


Here's one side of my classroom library. I include leveled readers in my library as well as interest-directed books.

Affiliate Links:
Rug

Chairs

Book Bins and Clip Boards - Really Good Stuff


This is the most whimsical part of our classroom. We call this our "dream tree" because we added our photos and our goals and dreams to it throughout the year.

Affiliate Links:

Tree

Pillow

Decor


Here's a look at my small group space! We love our color coordinated circles and stools. I ordered the circles from Etsy and got the stools from Five Below and Family Dollar last year. The circles adhere to the table and are perfect for writing on with a dry erase marker. 

You can also find similar stools through Amazon:

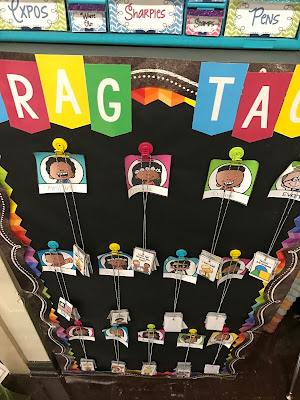
This is the first year that I implemented brag tags in my classroom. Students earn brag tags for achieving goals, good behavior and a number of other things. They collect them on a necklace and get to wear their necklaces on Fridays!

Affiliate Links:

Here is our cubby space and also my own organization space. I do not have a teacher desk, so this area keeps my life together. The baskets are from Really Good Stuff and the sign is from Target.


These two spaces hold our supplies and manipulatives so that they are available for students to access independently. My goal is always to create a classroom environments that promotes student independence, these area make that possible. You can also see our early finisher baskets kept above. I do not use things in my baskets that require tons of time. I usually put file folder games, and familiar workstations in there that students can do independently. 

This pencil bar saved serious sanity this year! You can grab those drawer labels from GlitterandGlue4k2's TpT store! I grabbed those gumboil machines from The Dollar Tree too!

This is the other side of our classroom. This holds our calendar, flexible seating chart, and objectives. 

Affiliate link:


Our objectives are typed and adhered using Velcro, to these boards that I spray painted so they are easy to change out!

Here is the flexible seating chart that I used last year to allow my students choice in their seating.  This system worked okay, but this is something I think I will change next year.


Affiliate Links:


Here's a peek at the border combo I used this year. I loved, loved, loved it! I had a board for each content area and the vocabulary that we had learned.

Affiliate Links:


I was so in love with these silhouette kids from Schoolgirl Style that I had to have them in my room. I bought the file from her TpT store and traced them using my projector and black paper.


That's all for today! Stay tuned for my next post all about that stage!
SaveSave
SaveSaveSaveSave
SaveSave